
VIP member
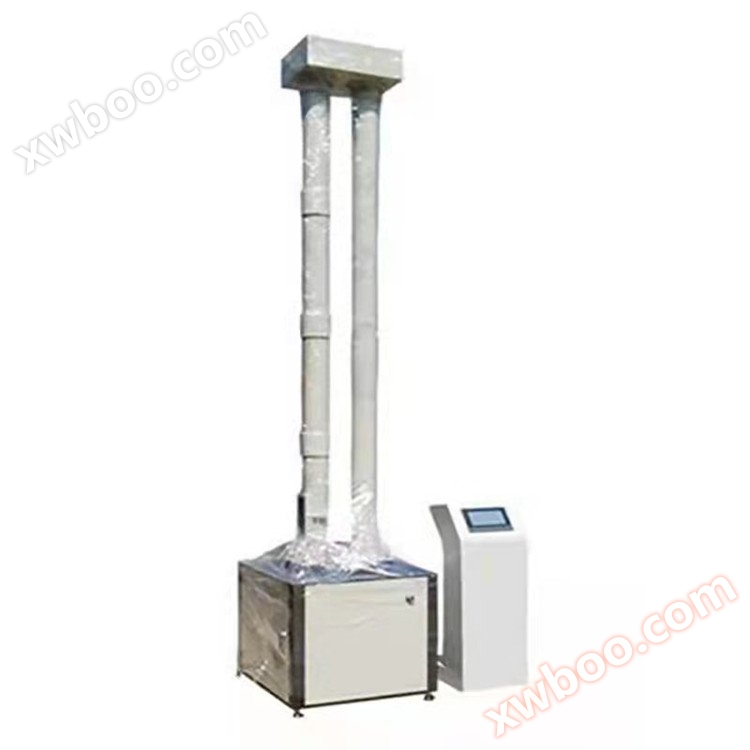

Plastic pipe drop hammer impact testing machine CZ-6006 drop hammer impact testing machine Power pipe drop hammer impact testing machine
Drop hammer impact testing machine Product model: CZ-6006 I. Purpose: CZ-6006 Drop hammer impact testing machine is suitable for conducting impact tes
Product details
Drop hammer impact testing machine
Product Model: CZ-6006
1、 Purpose:
The CZ-6006 drop hammer impact testing machine is suitable for conducting impact tests on non-metallic material products and is a testing instrument used to evaluate the impact resistance performance of materials. To evaluate the quality of materials. Both the pass method and the gradient method are applicable.
2、 Performance:
This testing machine adopts microcontroller control technology, which can preset the impact height, automatically prevent secondary impact, automatically lift the hammer to the predetermined height, and display real-time height. The machine has good reliability and high accuracy, and meets the requirements of professional standards ZBN72026-90, GB/T18102-2007, and GB/T14153-2002 technical specifications for drop hammer impact testing machines.
3、 Main technical parameters and specifications:
1. Operating temperature: 10-35 ℃
2. There are no major sources of vibration or strong electromagnetic fields nearby.
3. There is no corrosive medium in the environment, and attention should be paid to ensuring good ventilation in the electrical control box.
4. Power supply: AC 220V ± 10% 2A
5. Hammer weight: 0.5kg 1kg
6. Workbench travel: 0-400mm
7. Sample diameter: 10-400mm or (plate, profile)
8. Impact height: 2000mm
9. Height positioning error: ± 2mm
10. Dimensions: Host (length x width x height) 600mm x 600mm x 3500mm
4、 Main structure and principle:
1. The testing machine mainly consists of a workbench, a secondary impact prevention mechanism, a support tube, a guide tube, a hammer body, a V-shaped body, an automatic hammer mechanism, a reducer, an electrical control box, and a machine base.
2. Working principle of the testing machine: Install a hammer installation fixture inside the testing machine conduit, and drive the fixture to lift the hammer body through the operation of the motor and gearbox. When the hammer body automatically rises to the required height, press the hammer switch to allow the hammer body to fall freely inside the conduit and impact the sample, achieving the testing purpose. The impact energy can be calculated based on the mass of the hammer and the impact height. When the hammer impacts the sample and the sample does not break, causing the hammer to rebound, the photoelectric signal control prevents the secondary impact mechanism from quickly clamping (connecting) the rebound hammer, achieving the purpose of preventing secondary impact. The V-shaped iron for placing the sample is installed under the workbench, with two screw rods installed on both sides. The screw rods are driven by the rotation of the handwheel to lift and lower the V-shaped iron.
5、 Installation of testing machine:
After disassembling the testing machine, place it on the foundation with the anchor screws, adjust the bottom of the machine base to make the verticality of the conduit reach 1/1000, and tighten the anchor screws.
VIUsage:
1. Experimental process
(1) Determine the hammer mass and impact height according to the experimental requirements. Prepare the sample for future use.
(2) Selection of Hammer Body Quality
A hammer body 0.5kg (including: connecting rod (aluminum) 150g, coupling 150g, hammer tail 50g, and D25/D30 hammer head 150g)
B Hammer body 1.25kg (including: connecting rod 550g, coupling 150g, hammer tail 50g, and D90 hammer head 500g)
The weights are shown in the table below
Mass (kg) |
number |
Mass (kg) |
number |
0.125 |
2 |
1 |
2 |
0.25 |
1 |
2 |
1 |
0.1 |
1 |
3 |
1 |
0.2 |
1 |
6 |
1 |
0.5 |
1 |
C、 Selection of Hammer Body Quality:
D25 Hammer Body: A Hammer Body (0.5kg)+Weight (300g)=(0.8kg)
D90 hammer body B hammer body (1.25kg)+weight (other weights)=(1-15Kg)
(3) Installation of Hammer Body
According to the selected hammer body and weight, remove the tray at one end of the hammer body, place the weight on the lower end of the coupling and pull rod, tighten the top thread, and install the tray.
(4) Power on
Connect the power supply, turn on the power switch of the electrical control box, and the display will show "0000" indicating normal operation.
(5) Installation sample:
A、 Press the "Quick Up" button to lift the hammer away from the bottom, and press the "Stop" button to stop the hammer from rising. To facilitate the installation of the sample.
B、 Open the sample chamber door and place the test sample on a V-shaped iron as required.
C、 Rotate the lifting handwheel to raise the sample, and the photoelectric indicator light will turn on (on the side of the lifting handwheel), indicating that the sample is low and light can pass through. Rotate the lifting handwheel to raise the sample until the photoelectric indicator light goes out, then slowly rotate the lifting handwheel to lower the sample and turn on the photoelectric indicator light. The sample installation is completed.
D、 Press the 'Quick Down' button. Lower the hammer to the bottom. Press the "Slow Up" and "Slow Down" keys again, lift and lower the hammer body, and observe that the hammer head in the sample chamber comes into contact with the sample. Stop the machine at this point, which is the zero point. Close the machine seat door.
(6) Installation method of hammer body
The hanging hammer is a manual method. Open the semi-circular door of the conduit, press the "Quick Down" button, manually hang the selected hammer body, and close the semi-circular door of the conduit. Press the down button to automatically stop, which is the zero point of the test.
(7) Pre set height
Turn on the power switch and adjust the position of the hammer by pressing fast up, stop, down, slow up, and slow down. After setting the position, press the>key to adjust the high brightness position of the four digit digital display. The high brightness position is the setting position. Press the ∧ key to set the high brightness position from 0 to 9. Set the four digit values in sequence (if you want to reset the value, press the reset key). Press the setting key to display the value as 0000.
(8) Press the up button again, the hammer body begins to rise, and the height display value begins to record the height traveled. When the hammer body reaches the set height, the motor stops running.
(9) Impact
Press the "drop hammer" button, the hammer will fall and impact the sample. When the hammer impacts the sample and the sample is not penetrated, causing the hammer to rebound, the photoelectric signal controls the hammer holding mechanism to quickly clamp (connect) the rebound hammer, achieving the goal of preventing secondary impact. If the hammer penetrates the sample, it does not have this function.
(10) Press the 'reset' button, open the semi-circular door of the catheter, and remove the hammer body.Attention: At this time, to prevent the secondary impact from being in a self-locking state, pull the two black rubber balls under the semi-circular door of the conduit to prevent the secondary impact from releasing the self-locking state.The experiment is completed. If the experiment continues, the above steps can be repeated.
Attention: To prevent the continuous operation of the hammer electromagnet from overheating, please press the button promptly after the test is completed“zero clearing”Key, remove the hammer body.
(11) Shut down
Turn off the power switch of the electrical control box and the main power supply.
2. Safety precautions
After the hammer body is lifted, no operation is allowed under the hammer body. The semi-circular door of the conduit and the door of the machine base must be closed properly.

Online inquiry
-
Contacts
-
Company
-
Telephone
-
Email
-
WeChat
-
Verification Code
-
Message Content
-