Geotek Company Introduction:
Geotek, a British company, is the designer and manufacturer of the world's best-selling core equipment MSCL (Multi Sensor Core Logger Core Comprehensive Testing System, also known as Multi Parameter Core Scanner). Almost every laboratory engaged in core research work in the world (scientific research, engineering exploration, oil drilling, etc.) has installed MSCL, with over 220 users. MSCL has very stable, reliable, and durable performance, suitable for both laboratory and field use. It has been widely used in core libraries, geological key laboratories, temporary field laboratories, offshore survey ships, deep-sea drilling ships, and engineering ships around the world. Geotek is the most commonly used core analysis equipment by scientists. Wherever there are rock cores on Earth, there are Geotek products.
If a core is worth taking, it's worth logging. ...岩芯宝贵,数据无价。

MSCL is currently the most widely used core scanner in the international scientific research and engineering fields, with over 220 users worldwide! MSCL is currently the most comprehensive integrated testing system for core geophysical and chemical properties in the world, applied to seabed sediment column samples, lake sediment column samples, rock cores, etc. The characteristic of MSCL is that it does not damage the sample, and multiple measurements are synchronized, fast, accurate, efficient, and fully automated. The maximum 10 parameters that can be measured include: P-wave velocity, gamma density, resistivity, magnetic susceptibility, color spectrophotometer, natural gamma rays, optical photography system, high-precision XRF element concentration (or handheld XRF), far-infrared temperature, visible and near-infrared ground spectra, etc. Customers can freely choose according to their own needs. Different MSCLs have different structures and can directly measure the entire rock core stored in plastic pipes, as well as measure cut open rock cores. Some measurements can be made through aluminum or stainless steel materials, but generally speaking, measurements made through plastic have better results. The multi model MSCL configuration has many advantages, which can be measured for different rock cores, operating conditions, and occasions to achieve the best results. MSCL has very stable, reliable, and durable performance, suitable for both laboratory and field use. It has been widely used in core libraries, geological key laboratories, temporary field laboratories, offshore survey ships, deep-sea drilling ships, and engineering ships around the world.
Small sample P-wave measurement system
MSCL-DPW
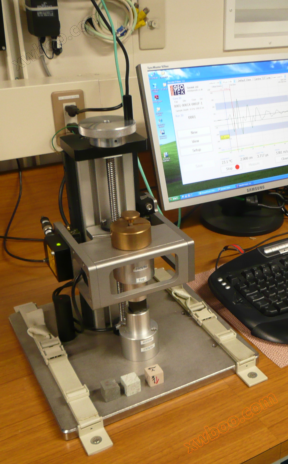
MSCL-DPW is a device used on workbenches, mainly for precise P-wave velocity measurement of rock or sediment samples. The thickness of the sample is measured using a laser micrometer with an accuracy of 0.02mm. Depending on the sample size, the accuracy of velocity measurement can reach a level better than 5-10 m/s. The automatic contact pressure control function can use the same contact pressure to measure different samples, ensuring repeatability and consistency of the measurement.

MSCL-DPW Small Sample P-Wave Measurement System
Simple speed measurement
The Geodek Small Sample P-Wave Measurement System MSCL-DPW is a device used on workbenches primarily for precise P-wave velocity measurement of rock or sediment samples. This single function device can quickly measure the P-wave velocity of any shape of rock sample. This device is particularly suitable for measuring velocity anisotropy of cubic samples.
precise measurement
The P-wave velocity is calculated in real-time based on the time it takes for an ultrasonic pulse to pass through the sample and the thickness of the sample. The system uses pulse transmission technology, combined with high-frequency digital processing technology, to provide highly repeatable and accurate transmission time. The thickness of the sample is measured using a laser micrometer with an accuracy of better than 0.02mm. Combined with the thickness of the sample and the transmission time of sound waves, the standard accuracy of velocity measurement is better than the level of 5-10m/s.
Automatic voltage measurement
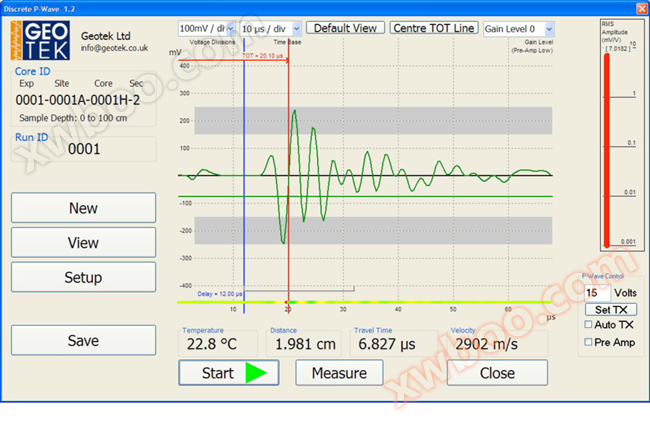
Different sediment and rock samples have varying attenuation effects on ultrasonic pulses, so the MSCL-DPW system can not only adjust the power level of the transmitted signal, but also control the gain of signal reception to achieve optimal signal and data quality. Users only need to ensure that the received signal is within the time gate range, and the software will automatically select the optimal power and signal gain amplification factor. Users can also choose to manually control these parameters.
Clear signal display
The sound wave signal is clearly displayed in the software window, allowing users to make selections. The delay time and threshold voltage can be displayed in a straight line on a virtual oscilloscope, and users can drag them with a mouse. The signal strength is displayed on the right side of the window, and the calculated rate value is displayed in real-time at the bottom of the window.

Operating software display interface
Easy to use
The top P-wave transducer and laser ranging sensor are installed on a sliding frame, which can be adjusted in height through a precision screw (pitch 15mm) and a rotating handle at the top. To measure a sample, first turn the top handle counterclockwise to raise the position of the transducer, then place the sample on the bottom transducer. Turn the top handle clockwise so that the upper transducer just touches the sample. The sound wave signal will be displayed in the software window and the P-wave velocity value will be automatically calculated.

Repeatable pressure
When measuring hard rock samples, it is necessary to apply an effective and constant contact pressure to the sample during measurement, which is difficult to achieve manually. The MSCL-DPW system can automatically complete this process. When using the handle to lower the transducer to make contact with the sample, when the contact pressure between the transducer and the sample reaches the preset level, the connection between the handle and the screw will be disconnected to prevent further increase in contact pressure. This function allows users to measure different samples using the same contact pressure, ensuring repeatability and consistency of the measurement.

